
Every Thursday, here at Like Mother, Like Daughter!

I made curtains for the third floor guest room, aka Sukie's room!
But wow, what a pain it was, every step of the way. Yes, let's start with the steps. (I'm going to leave out the step, halfway through this project, when I super-glued the workings of my sewing machine. That alone is funny enough for you! Be content with that amount of laughing at me!)
The room is on the third floor, in the front. My sewing machine (I'm currently using Phil's Nana's Featherweight thank you very much) is on the first floor, in the back. This is when you realize how often you need to look at the place your project is ending up — when you just can't face running up two flights of stairs yet again.
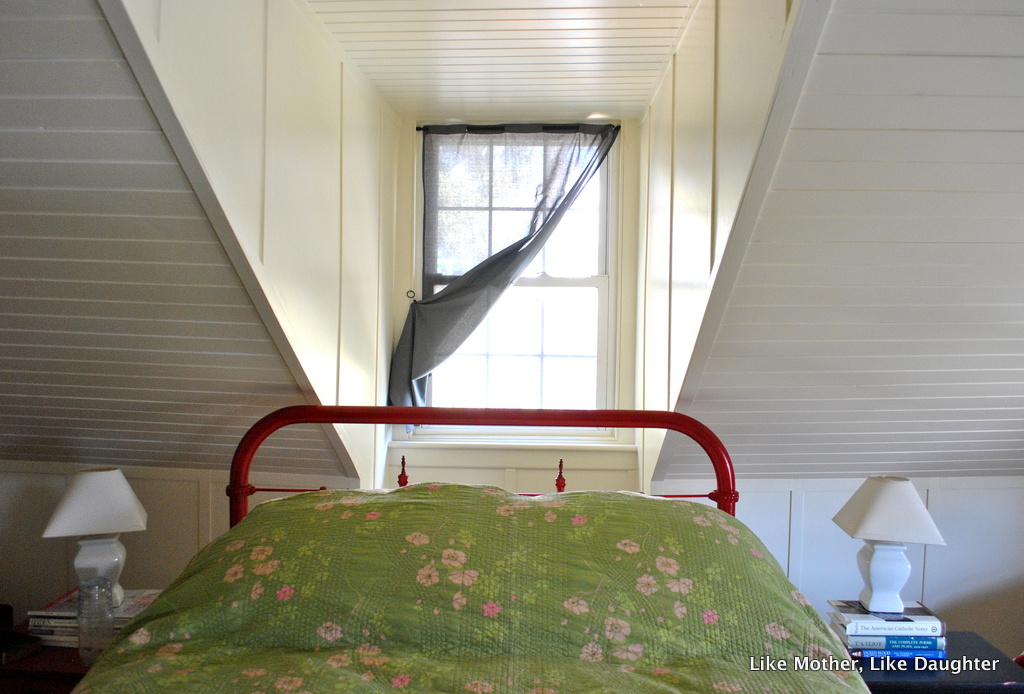
The windows up there — two alike, facing one side, and one different — are small, so that's good for not spending a fortune (unlike my downstairs windows, that are sort of a major investment to cover). I have blinds for the two facing east. (And that's another part of the pain, because when Brian, the guy who does a lot of the heavy-duty work around here, was re-doing the third floor, he lost the hardware — no biggie, because really, those blinds are cheap — but I just couldn't make myself throw them away for lack of hardware. Cue long search for replacement hardware marked by uncertainty as to outcome. And the hardware is like a bar puzzle. But the Chief figured it out — he always does.)
I wanted to cover the blinds with curtains, but I didn't want anything overwhelming.
First, I couldn't find fabric or curtains I liked, of course.
Then I was in Target and saw a shower curtain on sale for $17 and thought, “Huh.” It's cotton. It's dark gray, and I thought that could work with all the different colors and patterns going on up there.
As we say in our family, “It doesn't NOT go.”
 |
 |
| Behind the flowery curtain is where the roof goes down on the other side — this is the third floor, remember? So it's a little storage space. |
I won't bore you with all the ways this was a pain — it would take too long. Like carefully measuring and then assuming that the larger number was the length, not width, of the window. That's not unreasonable, is it? And who can trek all the way up there to check?
But no, the larger number is the width. So when I hacked the curtain into pieces, using the bottom half for the two equal bits, they were just. wide. enough – for the exact size of the inside of the window. Nothing left over.

That was fine, except for — how to attach it? A rod wouldn't work, because the blind takes up the entire depth of the window where a rod would go in. (I did buy tension rods just in case, but no. No room.) Putting a rod above would expose the fact that there isn't enough fabric!
I thought about gluing the curtain to the top of the blind, but I think it would fall down after being pulled back a few times, and who wants curtains always down?
Will says the internet has all the answers, but I couldn't find an answer for this one!
Finally I just decided on twine, attached to the wood of the window frame with little black upholstery tacks.


You can just unhook the clip from the ring, leaving it on the fabric. That lowers the curtain. Then you can hook it up when you want. (I do now wish I had been more careful about sewing up the sides, seeing that they are exposed this way.)
It will probably necessitate a tutorial for every guest, but that's kind of how things are around here — everything comes with instructions, because of so much hacking! I wonder what it would be like to live in a place with actual draperies….
The truth is, I like things a little funky.

For the third window, which is in the dormer, I used the top of the original shower curtain — it has slots that a tension rod can just thread through. I had to cut the top in half as well, and sew one piece onto the other to get the length I needed. So yes, there is a placket with slots going across the middle (you can't see it when it's pulled back like this), but it's cute and balances the shirring on the others. Besides, there is no way to get to that window without crawling behind the bed! I doubt anyone will do that. That window faces north, so not much light comes in there for the most part.
I put a little bow of twine on the right side so that when you pull the curtain back (with one of those same clips) it doesn't pull away from the wall at the top. The tension rod sort of captures one bit of the twine against the wall.
 |
| That's one of those Mexican beetles climbing up my frame! Never mind. |
 |
Tomorrow I'll try to post about the liver pate I tweeted about. Don't follow LMLD on twitter? Why not sign up now?


I don't know if this is what you would call a tension rod, but when I was in Primary School one of teachers had a book shelf covered with a curtain. The curtain was attached on a piece of taut wire (covered with plastic coating), there were small ring bits, imagine a dash with a circle on the end (technical jargon, that!) and then a screw through the ring. Don't know if they are still available but I think traditionally they were used for putting up net curtains in kitchens. Anyway, just a thought.
I do love the ruffles though!
I really like the “it doesn't NOT go” decorating mantra 🙂 seems very freeing
Wow! So cute. I really love that room. When I was a teenager I had an attic room and I loved it. 🙂
Hilarious! If I had been there, I would have run upstairs for you to check the dimensions!
Oh wait… no, I probably wouldn't have.
I have been known to say such things as “It doesn't not go” too! And I wouldn't have run up the stairs either. But it all turned out and looks lovely!!
Oh, Auntie Leila! Thank you for sharing the whole *thought process through to finish* as it reminds me to be a divergent thinker…Yes! I think the final product is just perfect! A bit of window covering that doesn't block out all light…I had to laugh when you said “I wonder what it would be like to live in a place with actual draperies….”I sometimes wonder that too, having never had such things. A blessed Holy Week to all
I like things a little funky, too! I think it's gorgeous! Well done and creative, as usual.
Thanks, Leila, for sharing this….so fun to red….and yes, I love the finished product too!
Thanks also, for hosting. I am very happy to link up!
Have a lovely day
God bless
I've been going crazy because of window hardware over here! I'm totally stealing the twine and nails idea! Now I just have to find some nails…
It IS pretty! “Make it work” never fails for me. I loved reading about your process.
I want that bedspread!! 🙂 Lovely room! 🙂
Amy Marie — it's another shower curtain! I found it at a thrift store. But who would need a quilted shower curtain??
“The truth is, I like things a little funky.” HA! Of course you do! That's what makes it all so interesting, and what keeps your brain active. No Alzheimer's for Leila! It looks very nice. As for the twine, I've seen that method more than once in magazines, with a curtain hanging by some string – why not? Your home is charming.
Lisa G., if this is what's going to stave of Alzheimer's, then I'm golden. My brain was hurting after all the problem-solving my “quick and easy” solution led to!
I love your decorating style – warm and inviting!!!
My hacks usually turn out better than following some plan – my quilts can attest to that. The curtains look great, much better than a shower curtain!
Love the curtains, and good thinking! It's so satisfying to find a solution somewhere around the house without having to buy anything extra.
My husband says the same thing about just DOING something in order to figure it out. So true. I love how it all came together!
Also, I have to tell you that I thought of you earlier this week as I loaded two dining room chairs into my van that I found for $3.99 each. “Auntie Leila always says you just have to be patient….” 🙂
So, tonight I found myself at Target and, remembering this post and my desperate need for window treatments in every room of this new house, decided to browse through the shower curtain section. First, I found the shower curtain you used to make the above curtains, only in off-white. And I felt like a stalker. Second, I found a shower curtain, on sale, with a lovely birds-and-flowers pattern that seemed suitable for Redheaded Snippet's room. I mulled it over and almost passed on it because the colors don't match exactly but then I thought, “You know, it doesn't NOT go,” so I went for it! And now I can't wait to see how these curtains turn out (especially since I can't sew)! Thank you for the great idea!
Pippajo, I got those too! They are in the 2nd floor guest room (aka Jojo's room) now. Let's see how it looks (next week maybe)!
Great curtains! So creative! I wouldn't have thought to use a shower curtain. I guess I just need to learn how to sew now. 😉
That room's so pretty! I really like the curtain-door-thing.
oh, you are so funny! I love that shower curtain AND the resulting curtains.
I am terrible with dimensions, so I borrowed a trick from my architect husband: I draw the window and then I measure it in every length and width it has, even ones I think I won't need like how deep is the windowsill or how wide is the trim (wide, in our old Victorian). I once made dreadful curtains when we were first married – I didn't know that gathered curtains should be twice the width of the window and then I just zig-zagged the edges instead of hemming them. I thought my mother-in-law would die, but she bravely buttoned her lips (and later, she made me exquisite nursery curtains, lined, with the plaids matching perfectly – tee he).
All this to say, I like the game of pretending it's the last fabric in the world. BEST way to get creative and find a solution! Oh, here's another solution for the kind of curtain you made, which is kind of what I made for my bathroom and was too confused to make into a proper Roman shade:
http://thriftathome.blogspot.com/2010/12/creamsic…
I put 4 ribbons on the top of the curtain, 2 in front, 2 in back, and then I simply roll or bunch up the shade to the height I want and tie a front and back ribbon together. When the shade is down, I tie the 2 front ribbons together in a loose bow. Hm. That might not make sense from my photos and explanation – like you said, sometimes you just have to DO it to make it work 🙂
Hi Margo,
I thought through the solution you have for your bathroom and was all set to do the same, but the issue still was the blind being set into the window in a way that doesn't allow for any wiggle room. No way to tuck the ribbons in above. I could only have sort of nailed them to the wood. And then there's the bulk of the shirring, which doesn't lend itself to being gathered upwards or pulled to the side, even.
But the ribbon solution is really nice for something that doesn't have a lot of fabric to scrunch up!